Compression
Add the tables and indexes that you choose, and Scops moves them to the compression level that you set, inside the window of each database.
Before you begin
- View Compression opens the page. Manage Compression changes databases, objects and profiles. Run Compression starts, stops, discovers, recompresses, retries and clears.
- The monitoring account needs the Compression grants, and
ALTER SYSTEMto stop a move. See Feature grants. - The tablespace needs free space for a copy of each segment that moves.
Scops does not check your Oracle licenses or storage, so you confirm the Advanced Compression license for each database that you add. Advanced Row (OLTP), index and LOB compression need the Advanced Compression option, and an online move needs Enterprise Edition. The Query and Archive levels need Exadata or ZFS storage.
Add a database
Open Add-ons › Compression and click Add Database.
Select the database.
Check the sections on the left. See Settings.
In the footer, tick I confirm this database is licensed for Oracle Advanced Compression and I take responsibility for compressing it. You must tick it before you click Add Database. Scops records your user name and the time.
Click Add Database.
Add the objects. Scops compresses only the objects on the Objects list.
If the badge next to the title shows Stopped, click Start Job.
Add objects
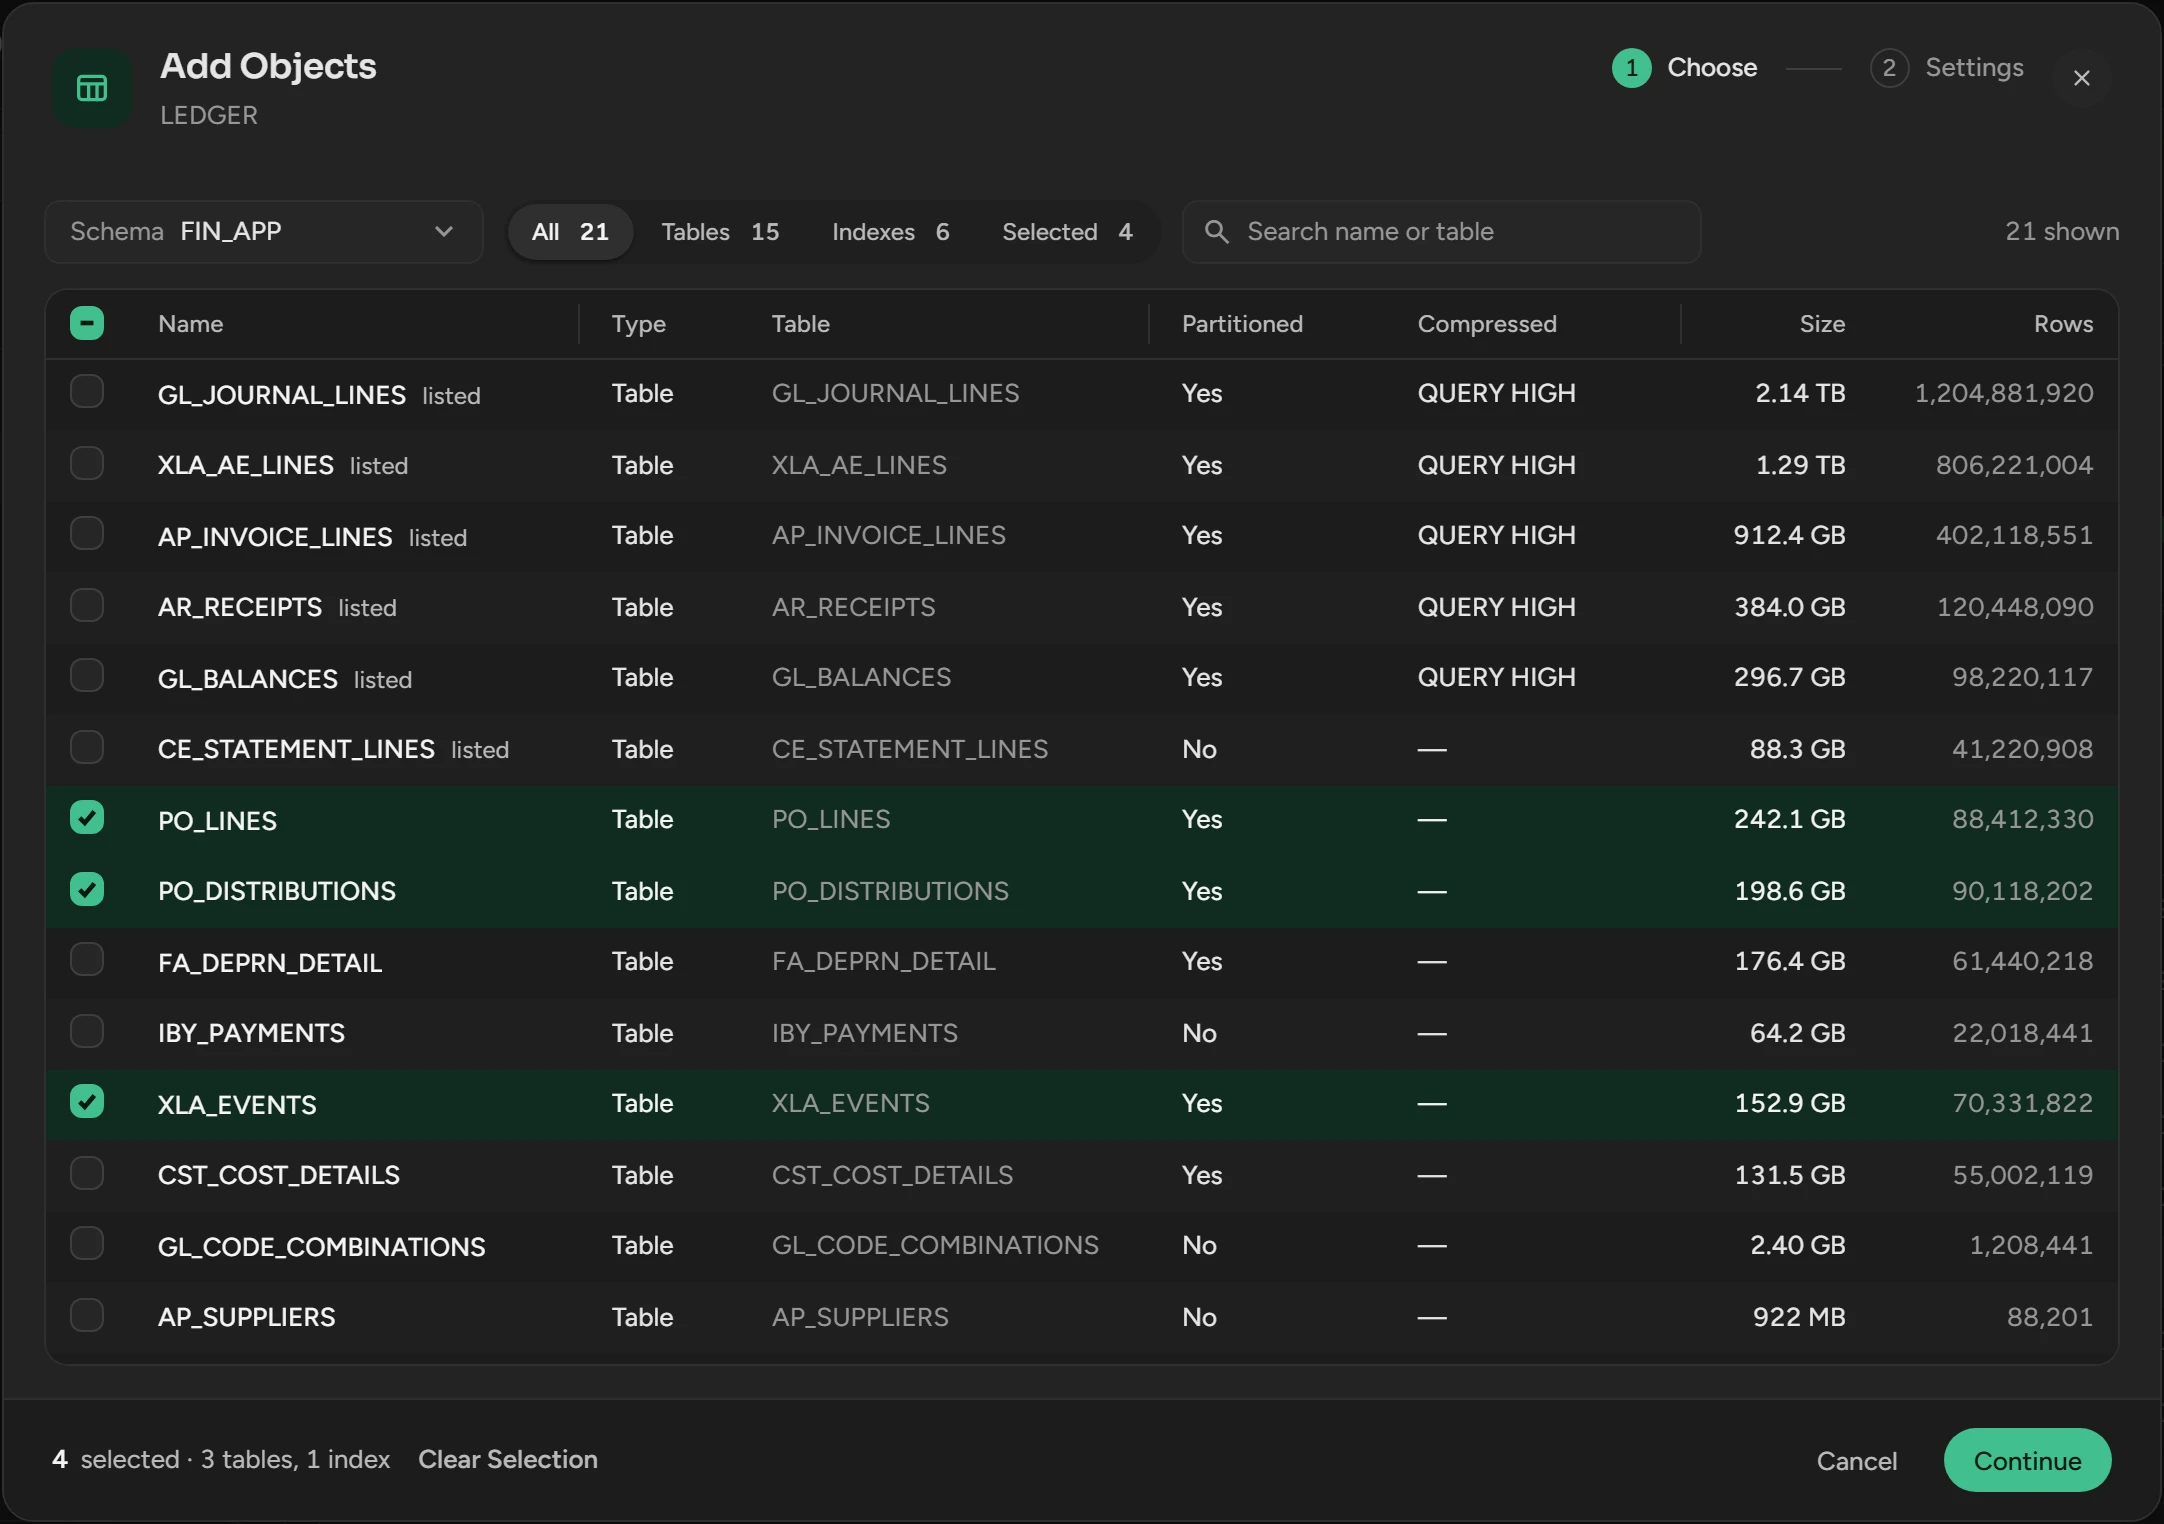
On the database, open Objects and click Add Objects.
Select a Schema and tick the tables and indexes.
Click Continue.
Switch each pass on or off, such as Compress tables or Compress LOBs, and select its profile.
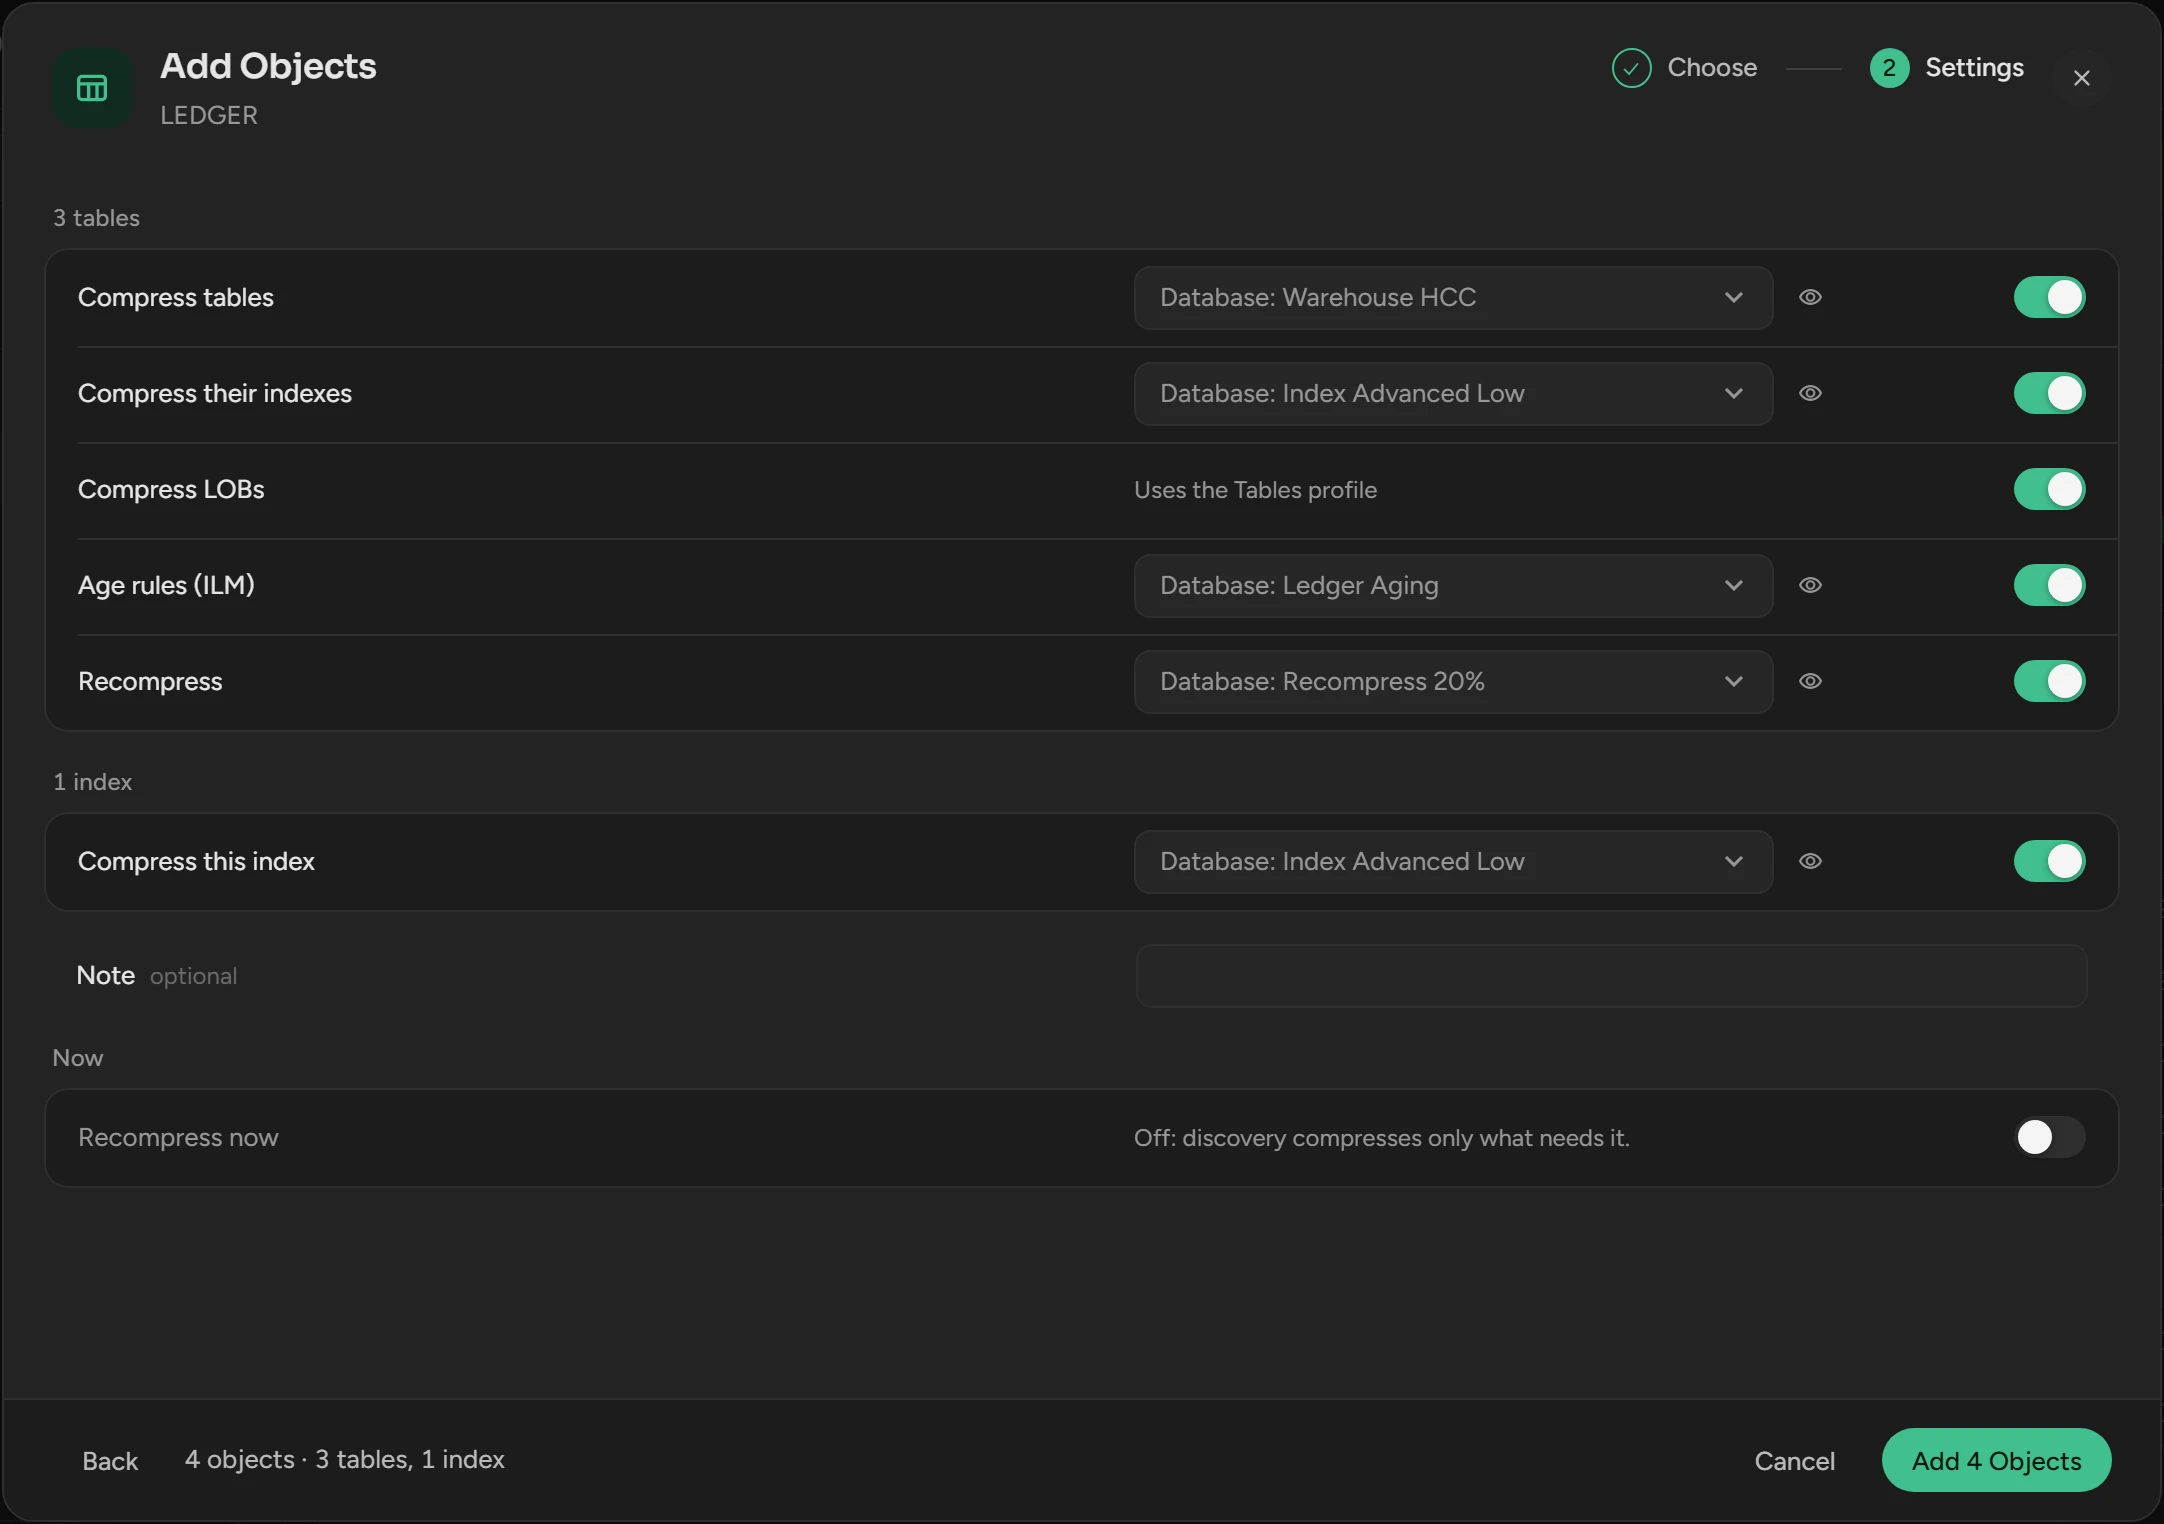
Click the Add button, for example Add 4 Objects.
The next discovery queues the work. Remove on an object stops its work and keeps its history.
Force Recompress
Force Recompress moves listed objects again: to decompress them, to go to a lower level, or to rewrite segments that DML left partly uncompressed.
On the database, open Objects.
Move the pointer over the row of the object, then click the Settings icon.
Under Now, switch on Force Recompress.
Click Force Recompress. If you changed a setting, the button is Save and Force Recompress.
For many objects, click Select, tick the objects, click Force Recompress and click it again in the message.
Scops queues each segment one time, with no size floor, after the work that saves more space. The moves run in the window of the database.
To recompress objects that you add, switch on Force Recompress in the Settings step of Add Objects.

Set the window
Click Settings on the database and open Schedule.
Set the Days, Starts at and Ends at, in whole hours on the clock of the Scops server.
Click Save.
Moves start only inside the window. At the end of the window, a running move goes back to the queue. Without a window, moves run at any time.
Compress partitions by age
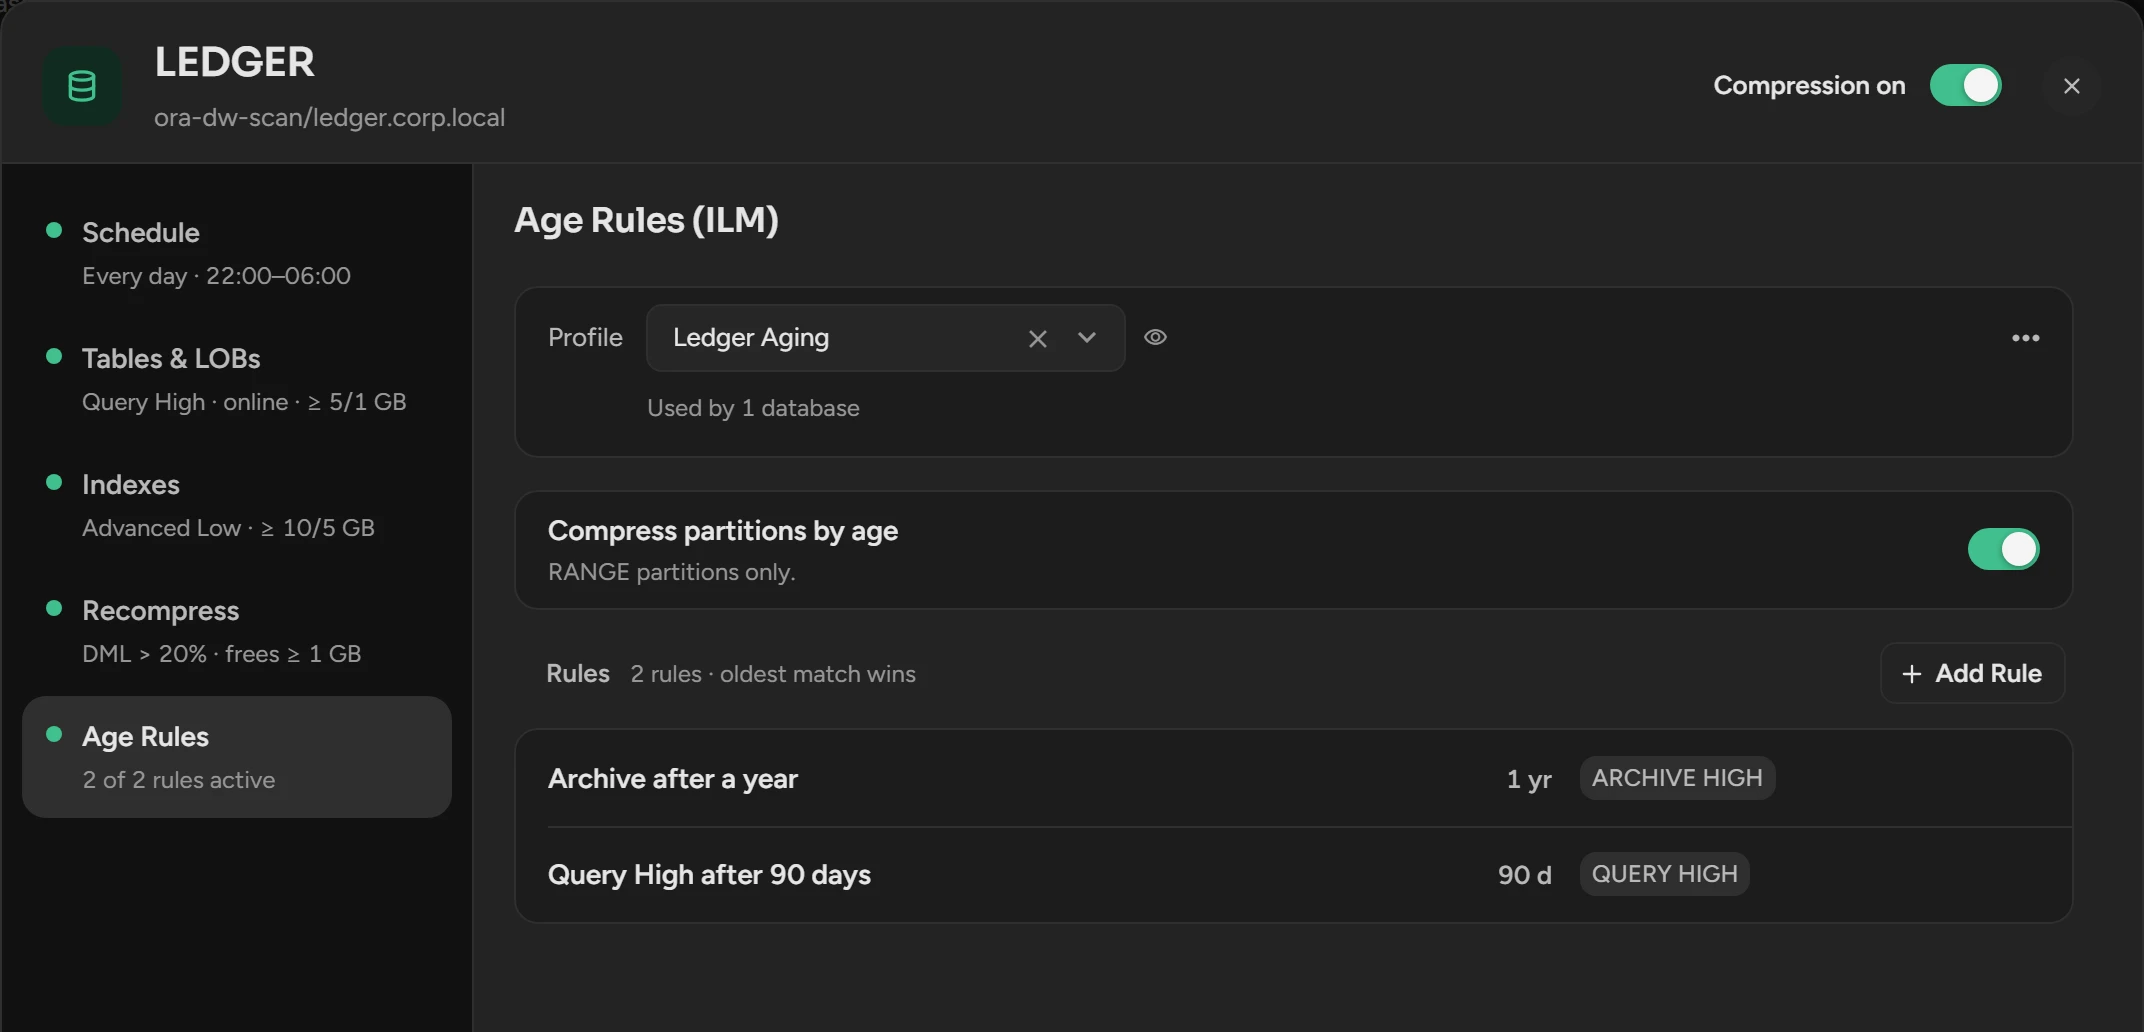
Click Settings on the database and open Age Rules.
Switch on Compress partitions by age.
Click Add Rule. Set the Name, Partitions older than and Compress to.
Click Add Rule, then Save.
Scops counts the age of a range partition from its upper bound, and the oldest rule that matches wins. Scops does not create Oracle ILM policies.
Update or clear the queue
- Every hour, also while the job is stopped, discovery queues the segments that are below their level. It never lowers a level. To run it now, click Discover or Discover All.
- To delete the queued tasks of a database, click Clear Queued on Queue. The next discovery queues them again.
Retry or clear failed tasks
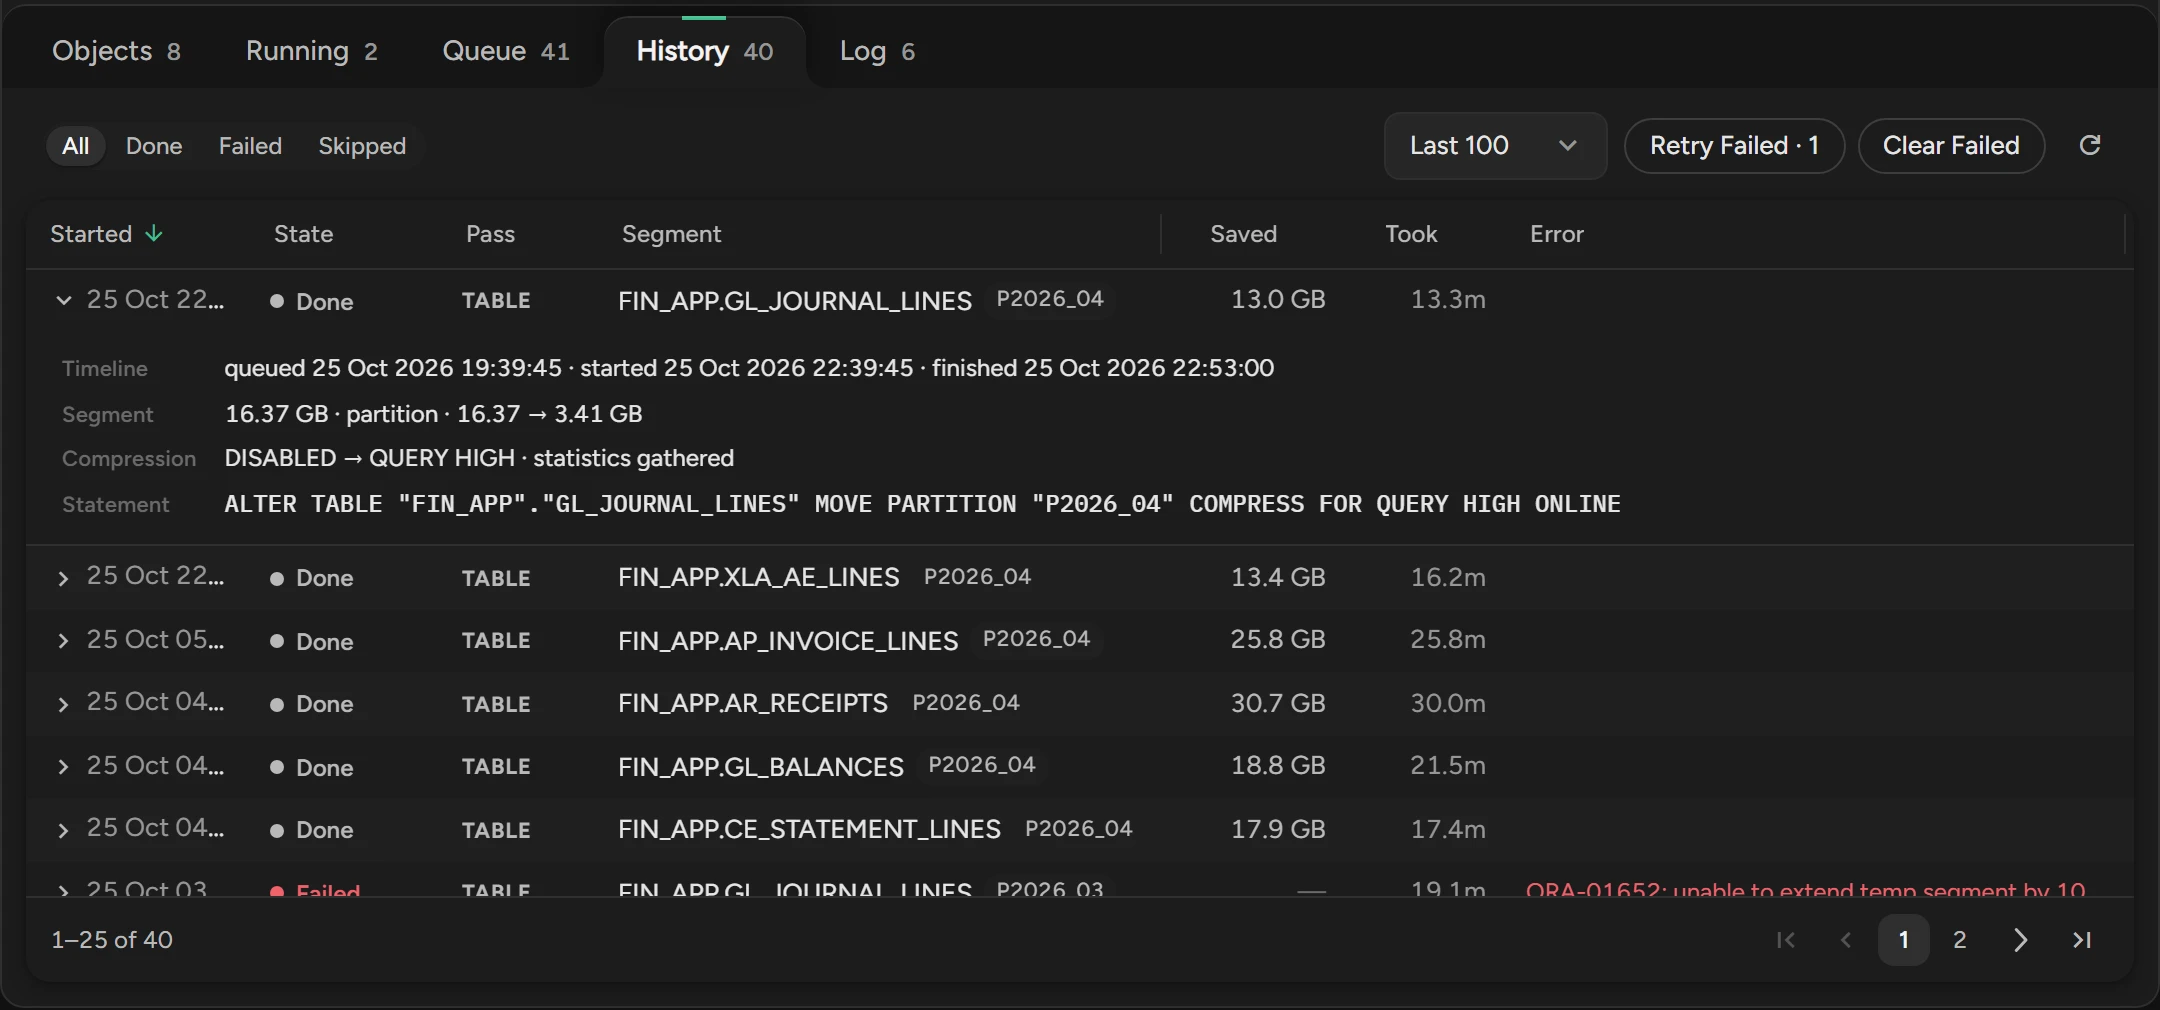
On the database, open History.
Open a failed row to see the statement and the error. Correct the cause.
Click Retry Failed to queue the failed tasks again, or Clear Failed to delete them.
| What happened | Result |
|---|---|
You stopped the move, the window closed, or other DDL broke a parallel move (ORA-12842). | Back in the queue. Not a failure. |
The table was busy: ORA-00054, ORA-00060, ORA-04021 or ORA-30006. | Failed. Scops queues it again each hour, up to 3 failures. |
| Any other error, such as no space, a missing grant, or a move longer than 4 hours. | Failed. It waits for you. |
Skipped means that nothing ran: the object was dropped, was at its level, left the list, or is a unique index on one column, which Oracle compresses only at Advanced High.
Stop and start
| To stop | Do this |
|---|---|
| All databases | Click Stop Job. The job starts again with Start Job, or when the next window opens. |
| One database | Click Stop on the database. Start starts again. |
| Some objects | On Objects, click Select, tick the objects and click Stop. |
| One database, for a long time | In Settings, switch off Compression on and click Save. The settings stay. |
Scops kills its sessions at once, and Oracle rolls back the move. The work goes back to the queue.
Without the ALTER SYSTEM grant, Scops cannot kill a move. The move continues to the end, but the job shows stopped.
Remove a database
In Settings, click Remove This Database. Scops deletes the objects and the task history of the database.
What you see
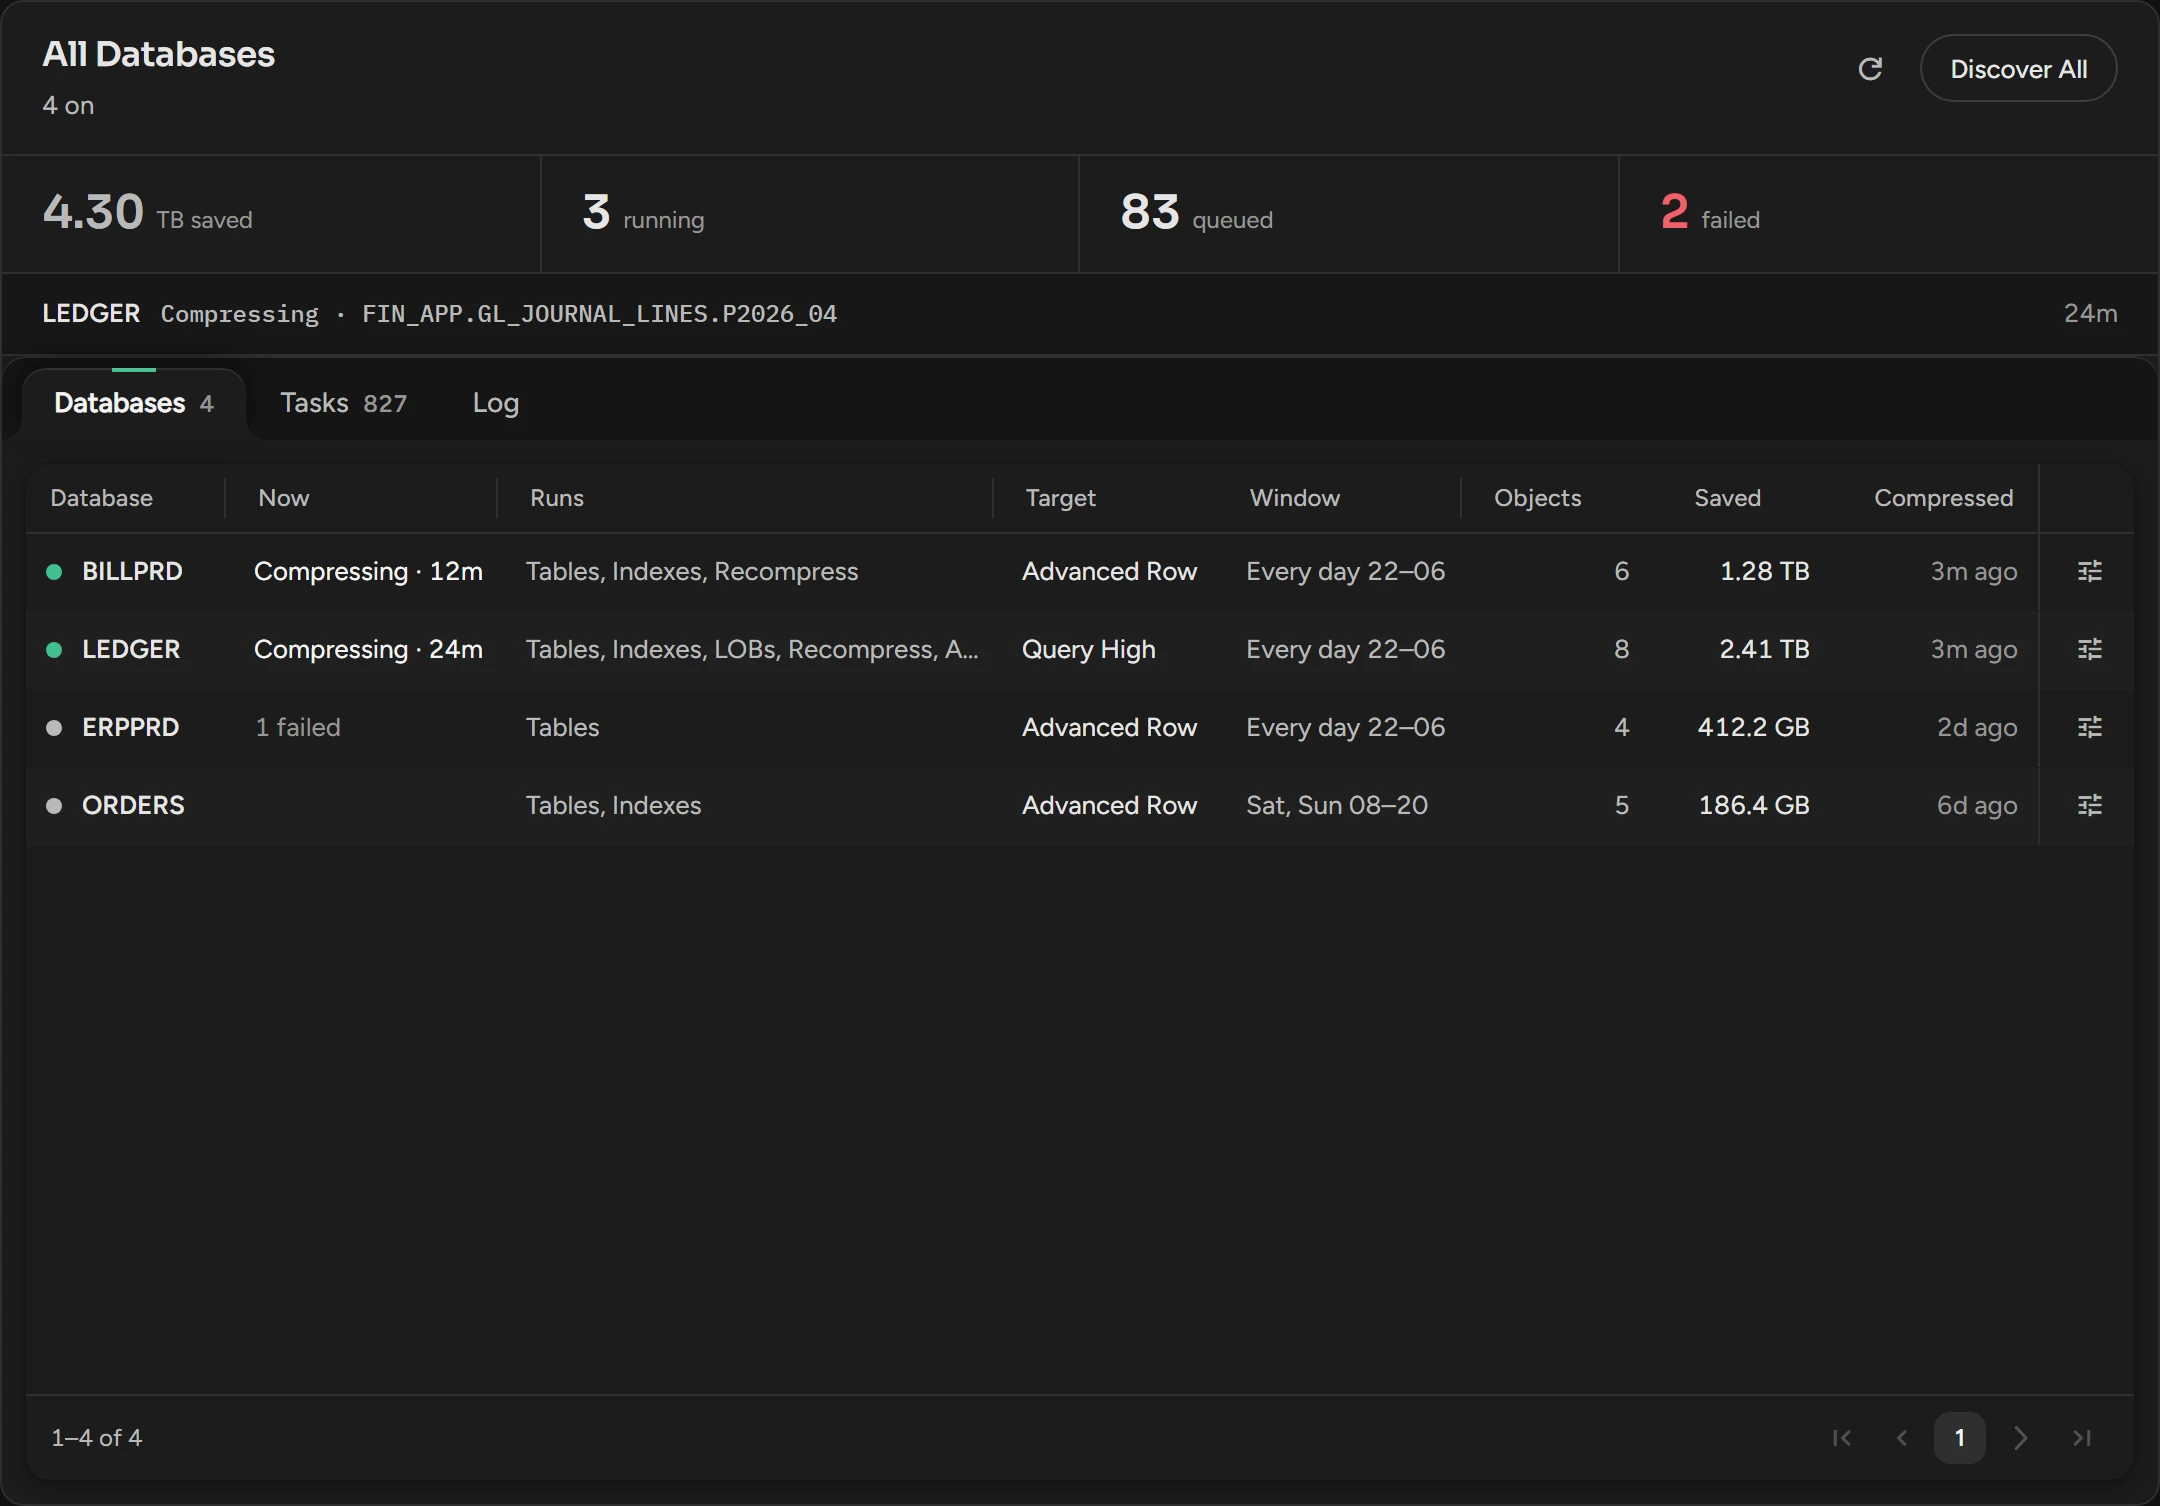
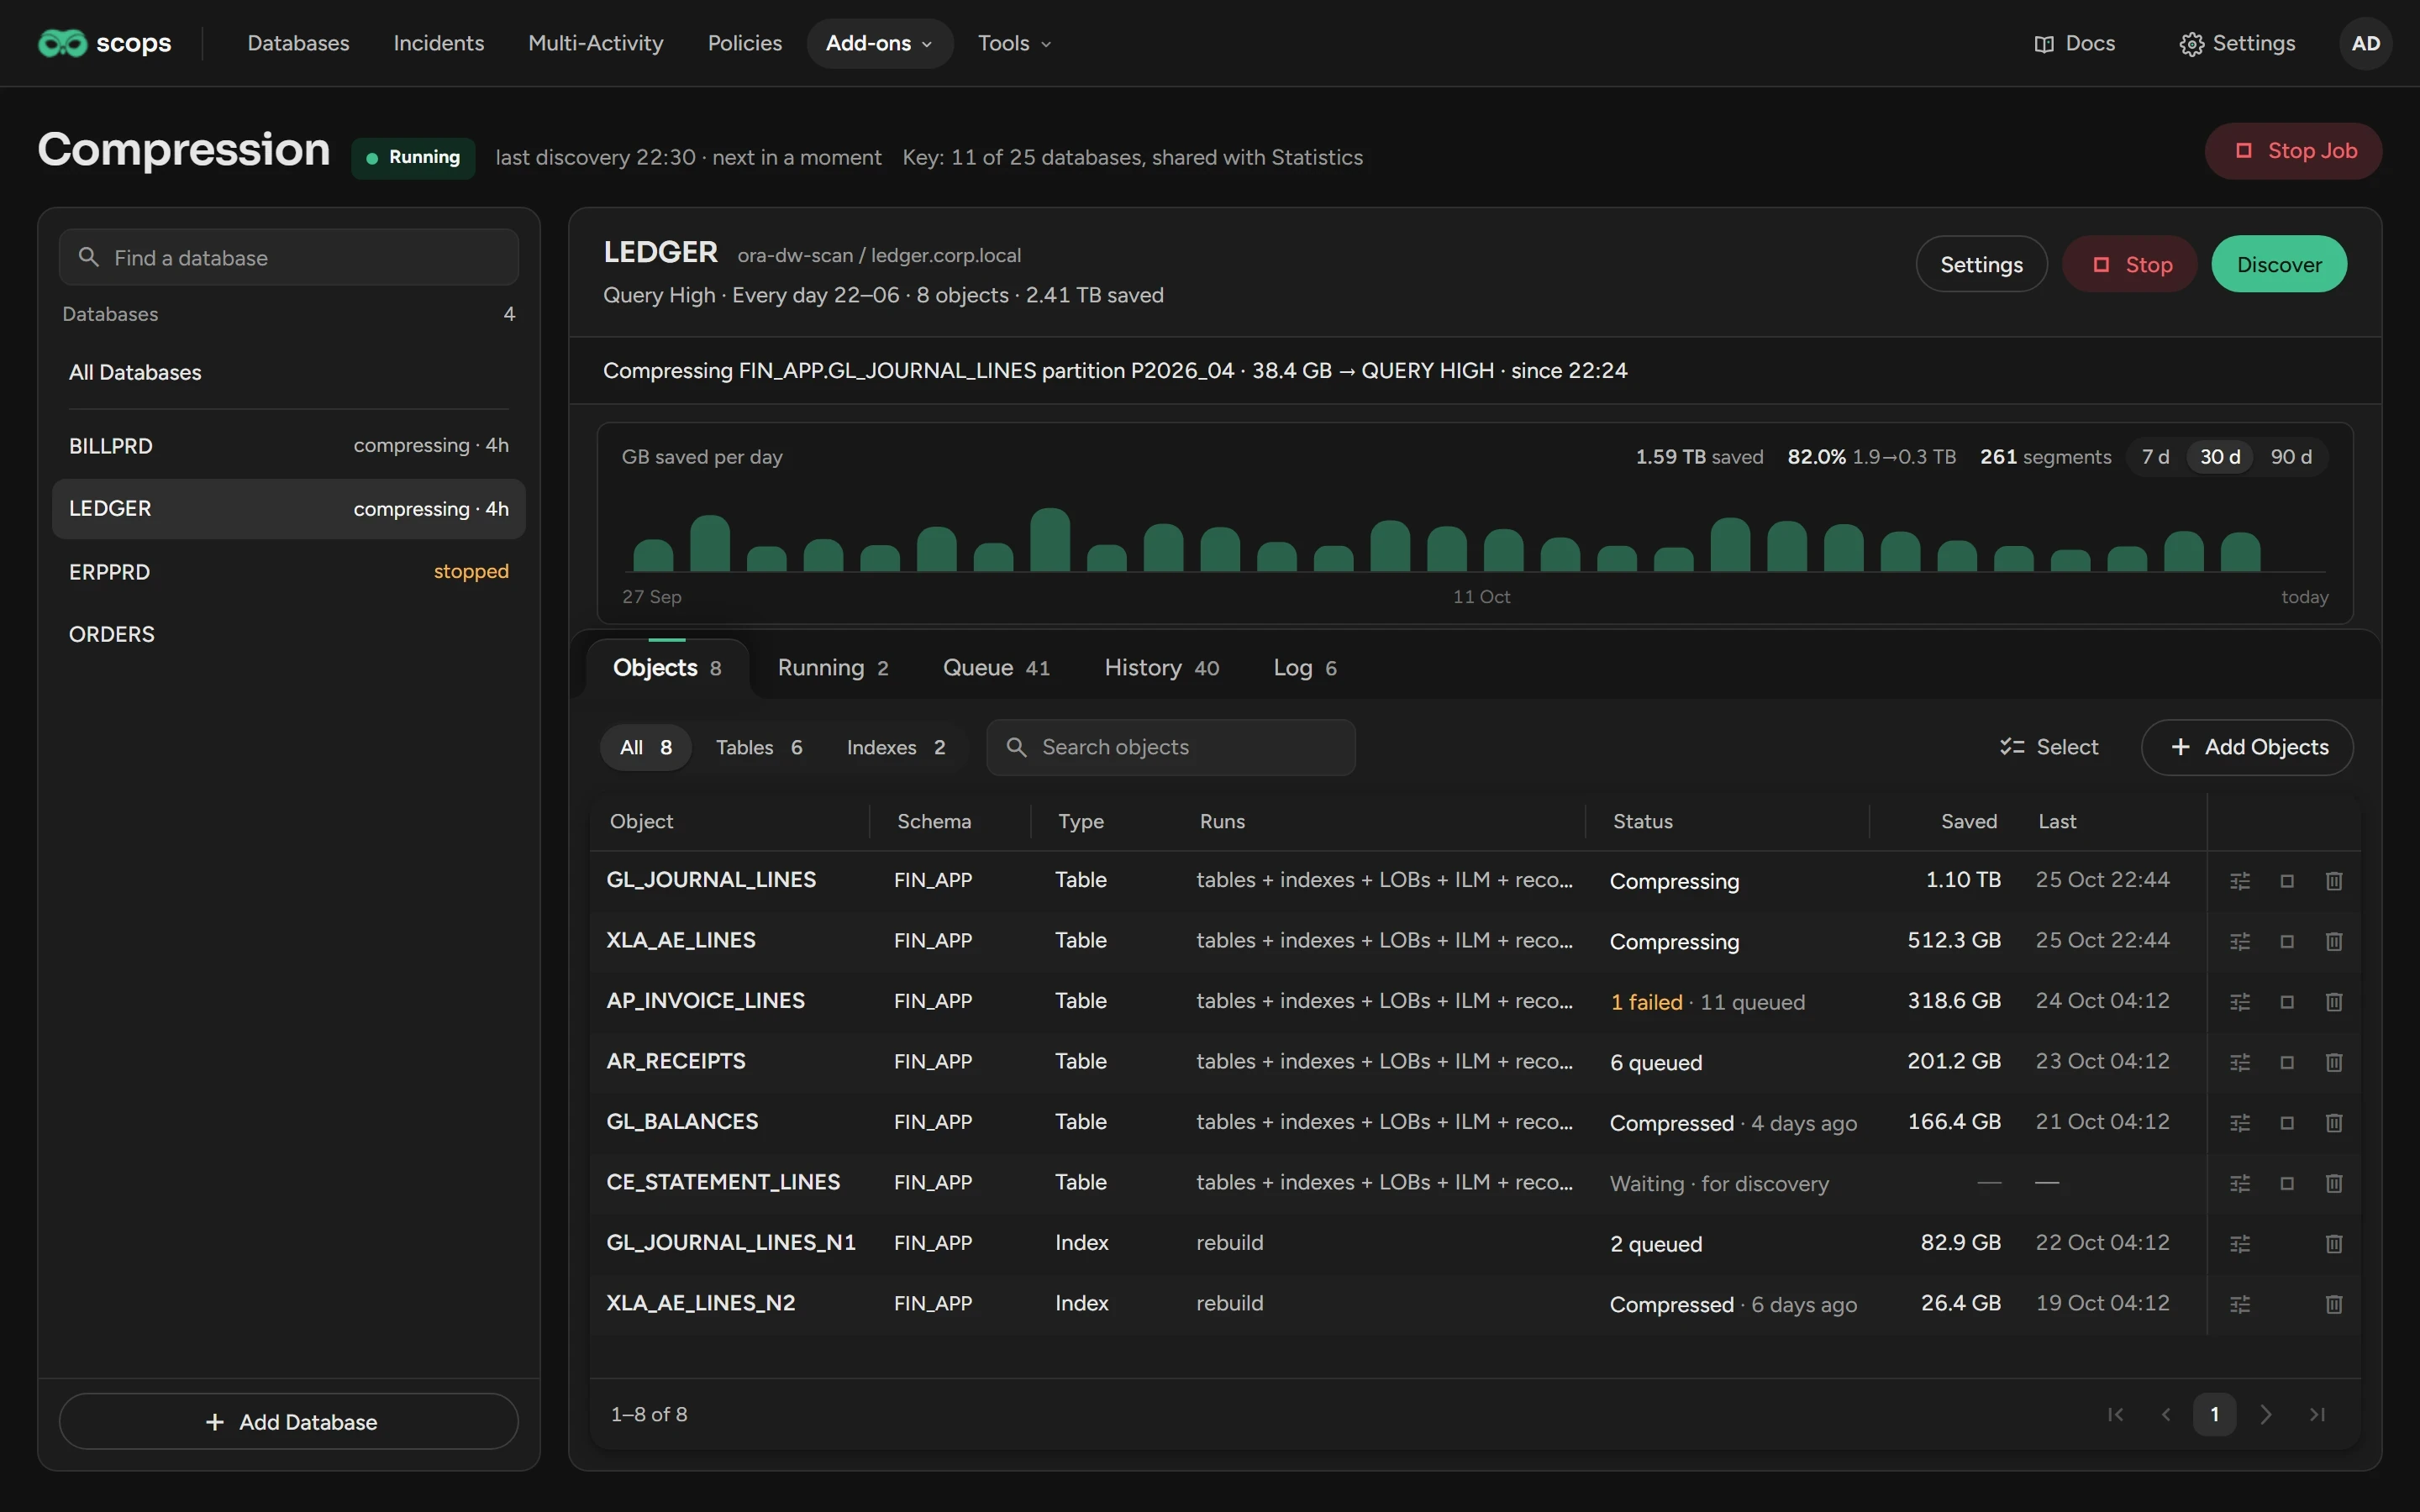
On All Databases, click a tile to see its tasks.
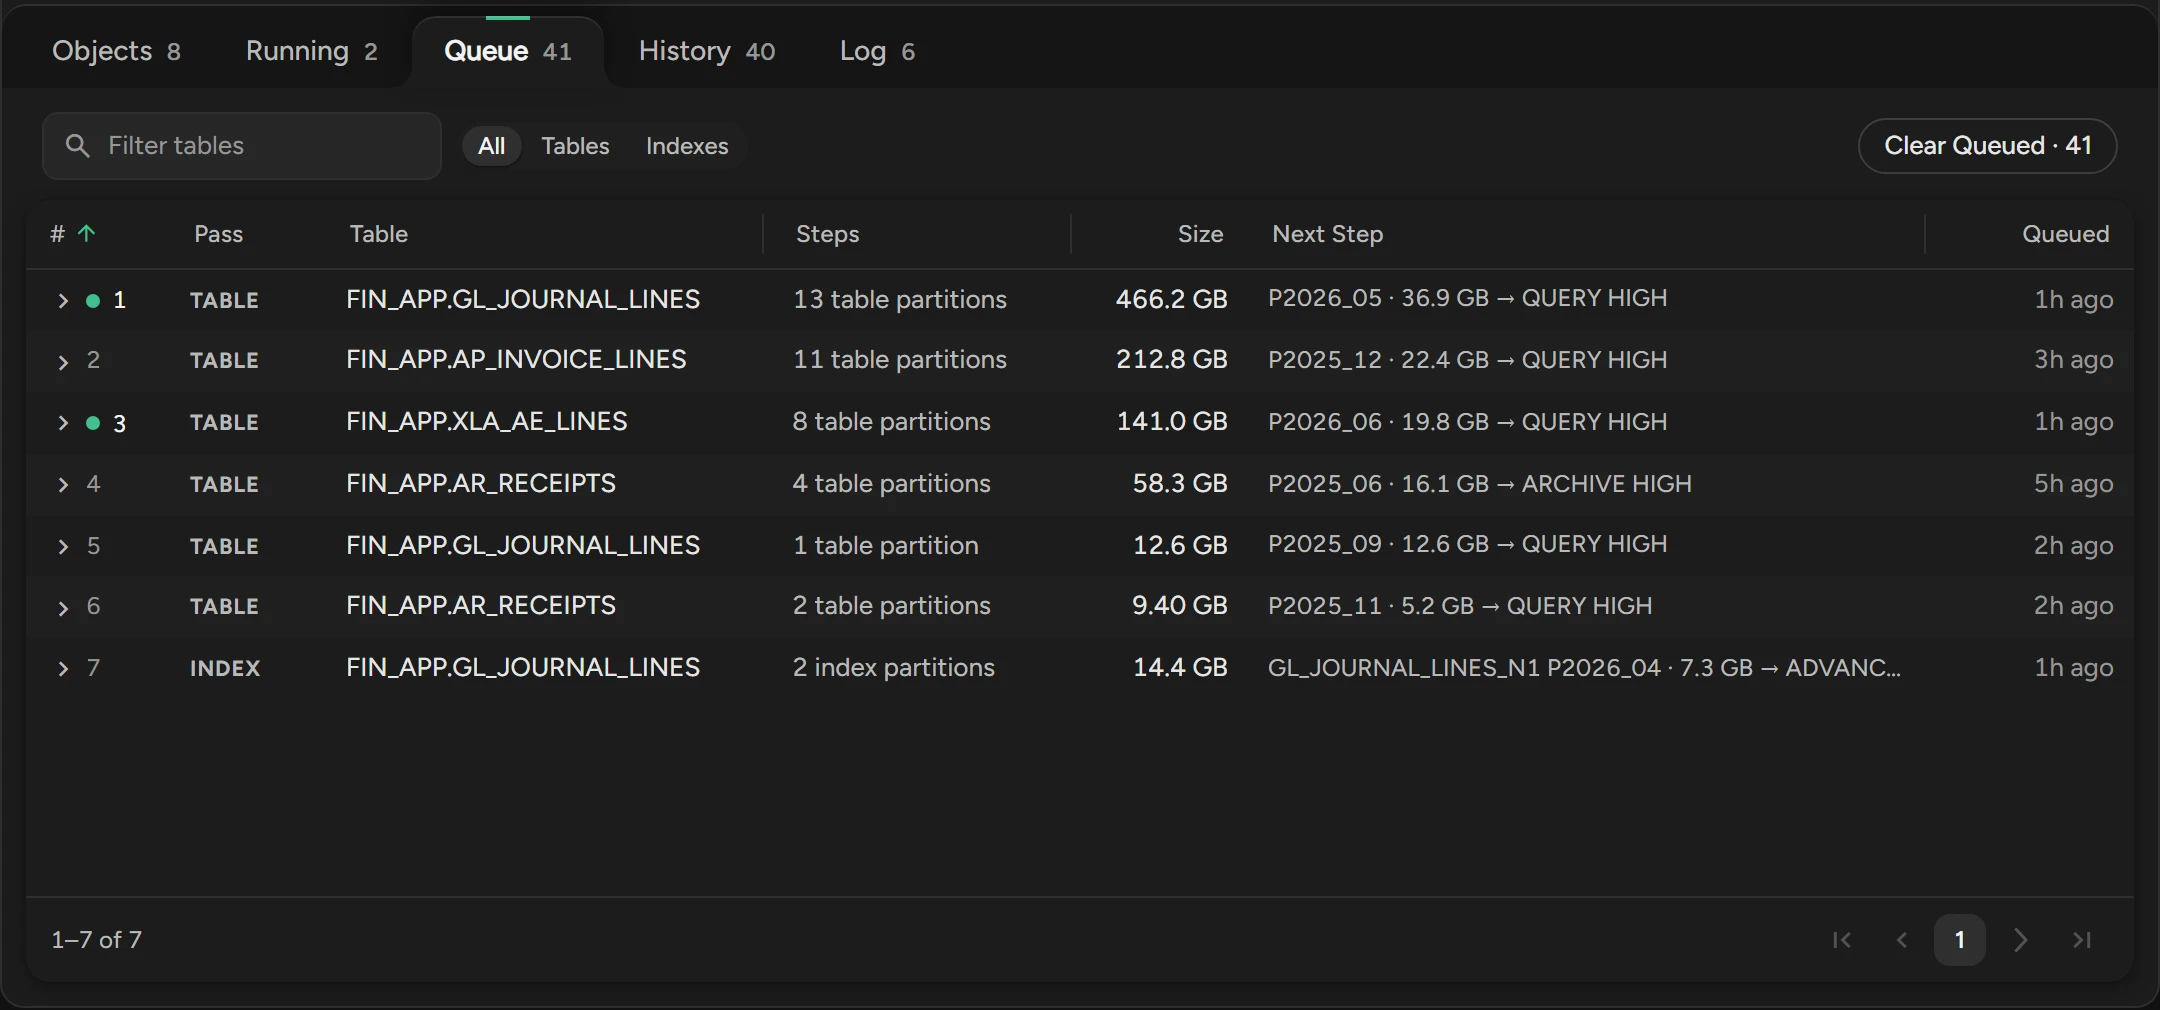
On Objects, Waiting · for discovery means that nothing is queued yet. Nothing runs means that all passes of the object are off. Too small means that the object is under the size floor of its profile: lower the floor or use Force Recompress.
Settings
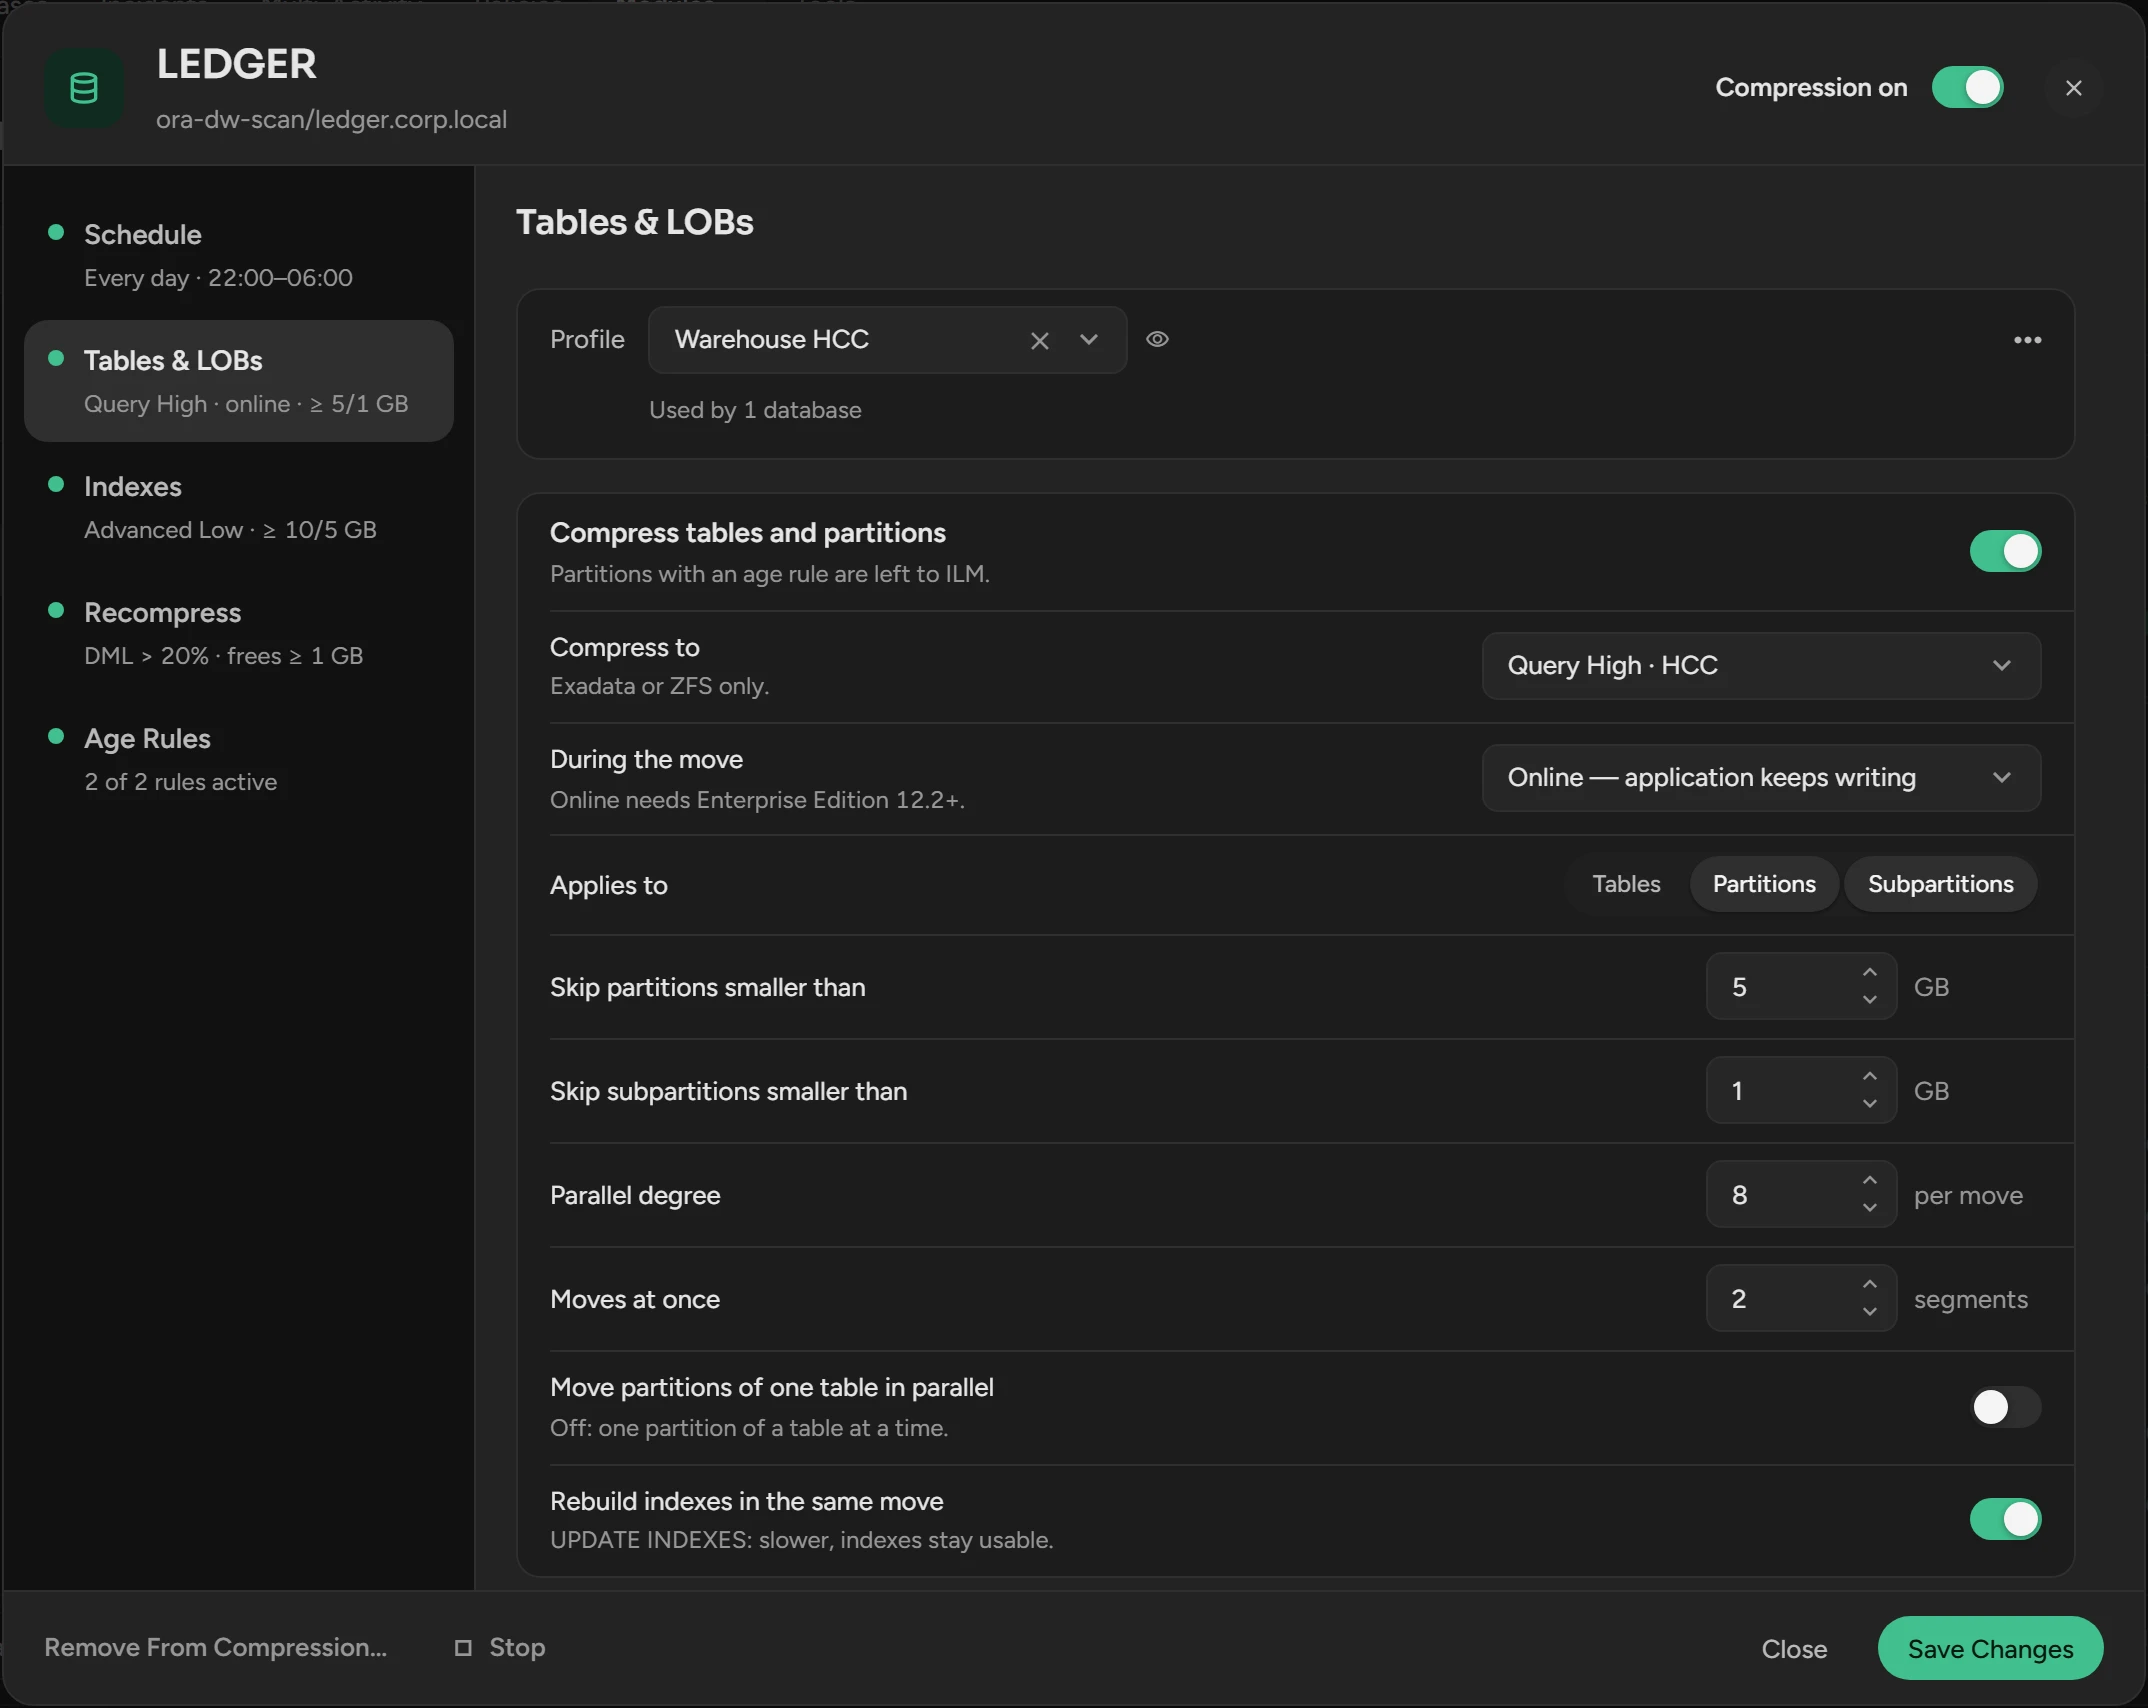
Each section is a profile that databases and objects can share. Save changes the profile for all its users. To change one database only, click Save as New first.
| Setting | What it does | Default |
|---|---|---|
| Compress tables and partitions | The table pass. | On |
| Compress to | Advanced Row (OLTP), a Query or Archive level, or None — decompress. A lower level needs Force Recompress. | Advanced Row |
| During the move | Online — application keeps writing, or Offline — exclusive lock. | Online |
| Applies to | Tables, Partitions, Subpartitions, each with a size floor. | Tables and Partitions; 50, 10, 1 GB |
| Parallel degree | Parallel servers for a move, 1 to 64. The DEGREE of the table does not change. | 4 |
| Moves at once | Segments that move at the same time. | 2 |
| Move partitions of one table in parallel | Moves the partitions of a table at the same time. This can cause library cache lock waits. | Off |
| Rebuild indexes in the same move | Adds UPDATE INDEXES to an offline move. | On |
| Compress LOB columns | Compresses SecureFile LOBs in the move of the table. | Off; Medium, 1 GB |
| Refresh statistics after each move | Gathers the statistics of the moved segment. | Off |
| Compress indexes | The index pass: Advanced Low, Advanced High or None — decompress. | Off; Advanced Low; 10, 5, 1 GB; degree 4, 2 at once |
| Look for wasteful compressed segments | Every four hours, measures the segments where DML touched 20% of the rows. Scops queues a move that frees 1 GB and a tenth of the segment. | Off |
At most 256 databases move segments at the same time: At once of the Compression job in Job Settings.
Related
Updated November 3, 2026